Stories in the Seams

posted in: History, Quilts, shop news | 0

In my shop, I share my embroidery patterns, kits, and finished pieces, but in my personal practice, I also quilt, knit, and sew garments. Quilting (by hand) was the first type of sewing I learned as a child and so it has strongly shaped my creative identity and knowledge base. I’ve often thought of adding quilts to my shop to share with you all, but could never quite land on my approach. Modern? Naturally dyed? Patterns? By hand or machine? Show-worthy perfect, improv, or artistic in style?

During this past year of pandemic isolation, I started fiddling with some wonky vintage quilt blocks in my collection and it occurred to me that stabilizing, aligning, and assembling them to completion was a project that felt true to my aesthetic sensibilities and love of history, while also resulting in unique finished pieces that are a sustainable embrace of past makers and their craftsmanship.

This is the first quilt I’ve finished that is for sale. It is posted here on my site where you can find purchase details and other specific details. As with any handmade item, its construction has a story to tell and I wanted to share a bit of that here with all of you to appreciate.

The first thing to catch my eye as I examined the blocks were the tiny scraps of paper caught under some of the stitches that form the colorful patchwork sections. No single scrap was large enough to reveal a whole word or date, but it indicates this patchwork was assembled using a Foundation Paper-Piecing method (not English Paper Piecing as there is no overcast/whip stitch present where the folded edges of each piece meet). In today’s quilts, we tend to think of this as a method for machine quilting, but here we see hand stitches in a heavy weight cream thread. I left as many of these paper remnants in place as possible within the layers of the finished quilt to keep its story intact.

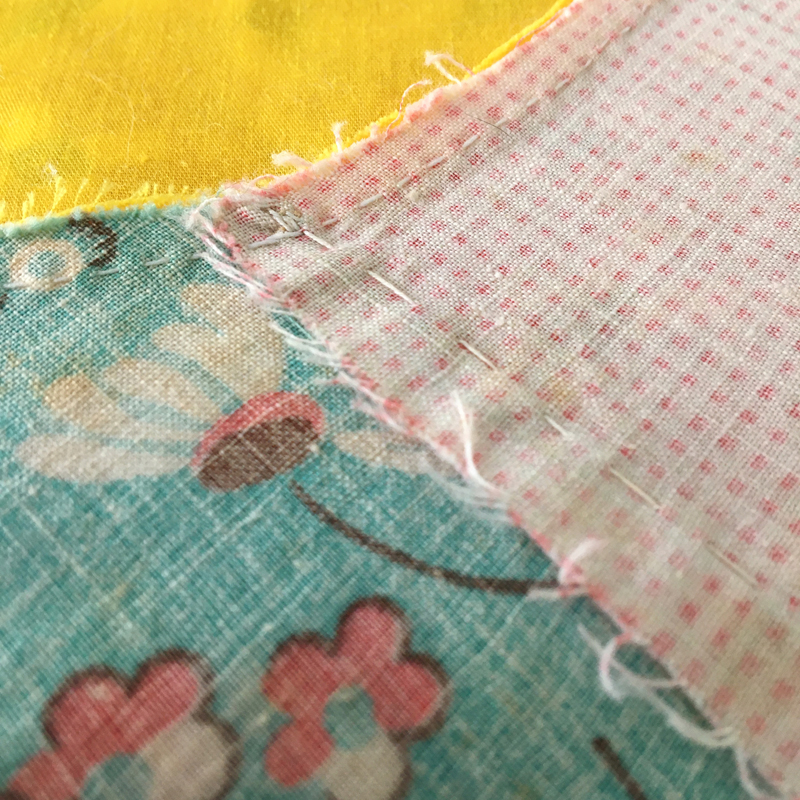
If you take a closer look at the stitches in the photograph above, you might notice something else that stands out. Not only are two different types of thread being used, but the stitch lengths and quality vary as well. These differences are consistent throughout each block, which leads me to think we’re looking at the work of not one, but two makers. Were they two generations of one family? Quilt circle friends? Did someone thrift these like myself and attempt to rescue them, but ultimately abandoned the project? Of course it’s possible this was the same person, but from first-person experience as a stitcher and teacher myself, I can confidently say that the muscle memory behind any individual’s stitches is a lot like handwriting—it can show shifts over time, but the root characteristics usually stay the same. In addition to these stitch characteristics, the yellow fabric that unites each block seems to date to a later period as it has the feel of a poly-cotton blend that sets it apart from the patchwork sections, further indicating the work was completed in more than one time frame.

Mail order catalogs like Sears offered an array of printed cottons and other fabrics for the home sewist.
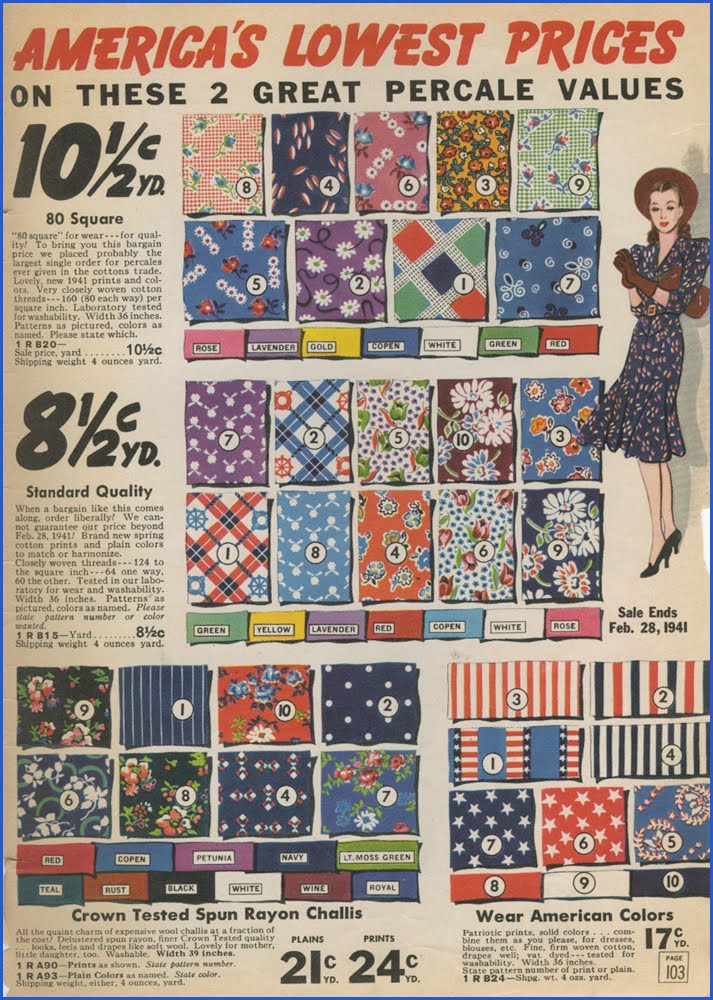
This advertisement from a 1941 Chicago Mail Order catalog shows similar prints, stripes, and colors to this quilt.

Just how old are these quilt blocks? I would place them somewhere between the late 1930’s to early 1950’s, and most likely in the latter half of the 1940’s when the maker would have had access to scraps from the 30’s (some of the mint, turquoise, and lavender scraps are likely feed sack fabrics from that decade) as well as a more active market for later styles of quilting fabrics post WWII. As the 40’s loomed with increasing patriotism, austerity, and concerns around world politics, we see color palettes for mass-produced printed cottons shift from the pastels of the 1930’s to more saturated and darker tones. Flower prints appear on relatively small to medium scales and in more painterly styles than the previous decade. Stripes return in popularity, often in bold American and British patriotic colors. Quilts of the 1940s tend to be a rarer commodity, given that so much time and labor would have been invested in war efforts on the home front—making these blocks pretty special!

The blocks were quite misshapen with fraying edges, loose seams, and wonky circles (or “squircles,” as I like to think of them). I squared these up so they could be sewn together without warping, leaving as much original “real estate” intact as possible. I stabilized many many seams by hand and even added in a scrap or two of my own vintage fabric where blocks were incomplete. Once stabilized, I assembled the quilt top on my 1957 Singer 401A Slant-O-Matic sewing machine. The overall design of the block/quilt top goes by many names—circle quilt, drunkard’s path, baseball quilt—and has many possible variations of which this is just one.

I used a turned edge finish as I didn’t want the presence of a binding fabric to constrain or distract from the vibrant vintage prints. On the reverse, I used a 1980’s reproduction feed sack print from my grandmother’s hand-me-down stash (now a vintage print in its own right I suppose!). In honor of this quilt’s dual modern + vintage nature, I chose to quilt it completely by hand in both traditional and modern styles: the traditional method is where you see the yellow-on-yellow ghosted circles hugging the inner edge of each “sunshine”; the modern “big stitch” quilting in white sashiko thread subtly highlights the edges of the the trellis-like interlocking patchwork. I hope that this honors it’s original maker(s) and helps to tell my chapter of the story. Maybe it will be part of your story next?

To see other photos, details, or inquire as to purchase, visit my O R I G I N A L S page.

Collecting Detroit Fashion

posted in: Collections, Costume Mounting, Museums | 0

From L to R, Clockwise: Tracy Reese’s Hope for Flowers line, sustainably produced in Detroit, Hope for Flowers via Vogue.com; “Press Operators, GM Fisher Body Trim Plant, Fort Street, Detroit Michigan,” 1982, Russ Marshall, American; gelatin silver print, via DIA.org; “Pink Bows” – Velvet empire-style with satin bow with beaded trim of silvered glass seed beads, bodice embellished with iridescent piette sequins worn by the Supremes, c. 1966, MaryWilson.com; Eleanor and Edsel Ford enjoy a baseball game on July 13, 1934, Detroit News File Photo.

What would it be like if Detroit had a center for the study and exhibition of dress history?

This is a question that has been rolling around in my mind for a while. As a dress historian and native Michigander, it’s heartbreaking to see this incredibly essential area of collecting not being championed within the leading institutions of our state and cultural center of  Detroit, despite the fact that we know fashion more than stands up to the cultural weight of history and the artistry of favored mediums such as painting and sculpture while bringing in record breaking ticket sales.

In recent years, Detroit has become home to a burgeoning fashion and style scene, lead by the likes of Tracy Reece, Detroit is the New Black, Shinola, Pingree, and Carhartt, not to mention manufacturing, support, and production training centers like the Industrial Sewing and Innovation Center, Detroit Garment Group, and Detroit Sewn, among others.

This promising future is backed up by millenias of diverse and significant modes of dress from the fine craftsmanship and deeply rooted identities of the region’s First Peoples, to the furs and influence of French traders, rich folk garments from successive waves of European immigration, commerically significant wardrobes of automobile industry leaders that shaped the visual narrative of new industrial wealth, humble but dignified factory worker’s coveralls, UAW jackets, the stylistic excellence of motown, and of course, the grit and glam of street style you can only find in Detroit.

In light of all this (the tip of the iceberg), how can we not recognize it’s significance and value to our community? Such a collection would be an invaluable tool for local students of design and fashion, an relatable yet powerful means of illustrating the stories, economies, class structures, and personalities of the area, a benchmark of the city’s revitalization—solidifying our identity as not only exporters of manufactured goods, but also undiluted style.

Would it benefit from being an area of collecting within an established institution such as the Detroit Historical Society, the Wright Museum of African American History, or the Detroit Institute of Arts? Even if situated in a satellite location, the existing infrastructure, support, as well as the concentration of funding and resources could prove mutually invaluable.

Would the challenges of establishing an all new organization, space, and funding streams outweigh the freedom to be found in establishing a new venture? The temptation of creating something new that could exist outside the strictures of the archetypal Euro-centric museum template is certainly exciting. The 21st century is certainly in need of community cultural centers that whose working structure and public face better reflect the world we live in with opportunities to craft spaces, exhibits, and events around progressive museum theory that redirects them from, in the words of museum thought leader Stephen Weil,” being about something to being for somebody.”

FREE Alternate Colorway for Flourish

You may have spied me working on a sample for my Flourish design over on Instagram or behind my table at a craft fair. I find it a relaxing pattern to work because it’s almost all satin stitch which gives it a lush and vibrant feel. While I love the original colorway, I wanted to see it stitched up in a palette of greens, coral, and a bit of pink to highlight more of the shapes as foliage rather than florals. Kinda cool how color alone can change a pattern, no?

In the past year, I had re-watched Golden Girls, thanks to the magic of streaming. Some of it holds up, some of it really doesn’t. Like so many sitcoms of the 80s and 90s, it serves up as many revolutionary moments as it does regressive moments. A certain aspect of it that remains iconic within the context of material culture, is the set design. You’ve probably seen endless recent examples of rooms covered in banana leaf wallpaper, and all kinds of derivative versions showcasing palm fronds, monstera leaves, and other tropical foliage.

Images from wellappointedhouse.com (L) and s3.amazonaws.com (R) via Pinterest

The colors and faux tropical vibe of the set certainly feel relevant next to today’s decor trends, from the oversized leaves, rattan and cane furniture, to shades of coral and millenial pink, all of which we find to full effect in Blanche’s (in)famous boudoir.

screenshot via GoldenGirlsFashion.com, “A Brief History of Blanche’s Boudoir.”

You guys should know by now I love a good origin story and this set is no exception. If you’d like to learn more about the designers and how their vision unfolded, I highly recommend this fun article, “A Brief History of Blanche’s Boudoir.” I found the, err, “overlap” in similarity between Don Loper‘s Martinique and Dorothy Draper‘s Brazilliance banana leaf designs particularly interesting as a possible example of women’s work being co-opted by a male to widespread acclaim. I bet Blanche Devereaux would have something to say about that…

At the very least, learning about the history and rivalry of these two designs gives us an interesting glimpse into the history of interior design and contextualizes today’s renewed obsession for these oversized beauties.

You can download this FREE alternate colorway as a 1 page PDF right here or just click on the preview to the left!

And if you find yourself in need of a pal or confidant as you stitch, I’ve also rounded up a few other helpful links for you:

Heart in (HER) Hand

posted in: Uncategorized | 0

Do you want to hear a story?

I debuted this embroidery pattern, “Divine Feminine,” last fall and you can now buy your own copy of it here. It’s chock full of some interesting symbols and juxtapositions that speak to my own cultural lineage (and, I suspect, to many germanic-scandinavian midwesterners). This design is a feminist take on age old symbols, many originating in European mythology, which underscore woman’s connection to nature, innate power, and steadfast will.

From L to R: Saint Augustine by Philippe de Champaigne, circa 1645, Oil on Canvas, Collection of LACMA; Painted Iron Hand in Heart Sculpture, C.H.Dawson, Odd Fellows Lodge, 1901, Private Collection; Felt and Leather Heart in Hand Pen Wipe, Unknown Artist, circa 1850-1900, Private Collection.

The central motif is the “heart in hand” symbol that has its roots in sacred heart imagery of the Catholic church. This secular version can be found in German-Dutch folk art, Odd Fellows ceremonial items, and in the Shaker community. In this context, it connotes personal charity and fellow feeling. In the Shaker tradition, this symbol is closely tied to the words of the orders founder, Mother Ann Lee, “Hands to work and hearts to God.”Shaker Museum | Mount Lebanon. Sampler. https://shakerml.org/object/?id=1894. Accessed on April 15, 2020

For me, a maker who finds relief, connection, and purpose in using my own two hands to create on a daily basis, this sentiment emphasizes the validity and honesty of this work in such a simple yet meaningful way. Of course, I couldn’t resist subverting it just a bit!

Victorian Jet Mourning Pin Hand Holding Flowers Brooch, 1840’s, Private Collection.

To the hand, I added a bit of black lace as is often depicted in Victorian mourning brooches of women’s hands, like the one above. I liked this both visually and how it can play on our ideas of what/who constitutes “traditional” womanhood.

Within the hand and just under the heart, you’ll see three small interconnected moons–this is the symbol of the Goddess in triplicate–the maiden (waxing crescent), mother (full moon), and crone (waning crescent)–together, the Divine Feminine. I border on agnostic these days, I must admit, but find something genuine and empowering in the concept of this natural cycle of rebirth and the passage of time, in nature’s power and precepts. I think about being connected to it and inspired by it all each spring when I plant a garden, learning new things about how each plant has been propagated and used throughout history. I think about it at the harvest and as colder days settle in when the garden is put to bed for the winter, under its snowy blankets.

For this reason, I rounded the design out with different plants and animal symbols. It was important to me to not be appropriative so I chose items based on meanings from my own European heritage. Perhaps they hold meaning for you as well? The two pine boughs encircling the central hand represent the sacred groves and their role as places of spiritual connection in both Germanic paganism and romanticism…it could be argued, I think, that the descendants of these philosophies could include Thoreau, the Transendentalists, Muir, and anyone who finds as much, if not more meaning in the cathedral of the woods than the wooden church.

The acorn, of course, speaks of limitless potential and of the steadfast strength of the tree it will become. The toadstool, popular in early European mythology, represents insight and wisdom due to its hallucinogenic properties. I included the paw print and feather to tie in the elements of earth, sky, and fauna. All of it sits beneath the arched phases of the moon, speaking of time and our place in it.

If you stitch this up, I’d love to see what colors you choose. Do they have specific meanings for you? Will you substitute some of your own symbols around the hand? Tag your work with #khgarts on Instagram so I can see!

Female Inheritance

posted in: Embroidery, History, Portfolio | 1

Female Inheritance (2018) by Kate Herron Gendreau. Hand Embroidery, Silk on Linen.

The Impetus

History is so often recounted through the lens of white male conquerors, businessmen, explorers, farmers, soldiers, and scholars—individuals privileged by their class, race, or wealth as dominate voices. It is relatively rare to be able to access historic accounts from marginalized perspectives or domestic landscapes. We can, however, find some of those perspectives in historic needlework pieces.

I was already enamored with textiles when I decided to focus some of my early research in grad school on historic needlework. In Boston, it surrounded me at every museum I visited, worked in, or interned at and was an accessible and rich trove of primary source material for reaching a wider understanding of the periods in which they were made. The art form became a more and more tempting medium for addressing complex ideas about the expected vs. real ideals and nature ascribed to womanhood. I created my own sampler, “Female Inheritance,” to reflect upon and capture the evolution of these paradoxes within our society in regards to gender, power, and identity politics.

Duality in Stitches

Girlhood samplers are often viewed as implements of obsequious isolation for women throughout history. They have not only been tools of oppression, but also tools of learning, power, and artistic expression. Working within and subverting this medium allows me to pay homage to its great —though commonly unacknowledged— artistry while also creating a dialogue with the past that seeks to question, rectify, and renovate our understanding of gender and identity in history and the present.

Considering that estimates for female literacy rates in the 18th century are between 31 and 48%, a sampler was a rare avenue towards education through exposure to and repetition of numbers and the alphabet (at least for those whose families could afford the tutelage and silks required for this capstone work), an opportunity they likely wouldn’t be exposed to otherwise. This duality is fascinating to me, as is the well-established iconography of the pieces themselves, honed by region and leading teachers within each. Many historic needlework samplers include the maker’s name and perhaps the year of their birth or the year of creation. It’s much more rare to be able to match these names with faces and events. I modeled “Female Inheritance” upon a sample worked by Elizabeth Derby in Salem, Massachusetts in 1774 as it is a thrilling exception to this rule.

Collection of the Peabody Essex Museum in Salem, Massachusetts (Item #3543), and featured in their 2000 exhibition catalogue, “Painted with Thread.”

“Modesty Adorns the Fair Sex Tho Life”

Elizabeth Derby’s story is an especially unique one of upheaval and a bittersweet independence. The daughter of a prosperous New England shipping family, Derby created her sampler at the age of 12 years old in 1774. Worked in silk on linen, its brilliant colors remain unfaded by time. One of the verses she’s included reads, “modesty adorns the fair sex tho life,” which, in retrospect, provides us with an intriguing opportunity to read a bit further into the expectations society, her family, or tutor had for Derby in comparison to the path she actually found herself on in life.

In 1783, Derby married Captain Nathaniel West against her parent’s wishes. Six children, one elaborately decorated home (rooms from which still survive in the Museum of Fine Arts Boston), and 23 years later, Derby divorced her husband in a “bitter trial” that was splashed across newspapers. According to the New England Historical Society, Derby paraded, “a series of prostitutes through a Salem, Massachusetts courtroom to prove her ship captain husband cheated on her.” Derby was not only passionate about seeking this divorce, she was also savvy. She had long been unhappy in the marriage, but acted only when the Massachusetts legislature passed a bill that gave women more property rights in cases of adultery. Derby was not only resilient, she was smart and willing to risk much for personal honor and independence. Divorce would have been extremely rare at the time and it left Derby estranged, living in isolation from society until her death in 1814.

Elizabeth Derby West via the New England Historical Society

In this light, her girlhood sampler almost reads as somewhat ominous to any woman living life on her own terms, in opposition to the strictures of societal conventions. Derby did not uphold the colloquial inheritance inscribed in it and suffered as a result. We can only surmise at what her actual personality may have been, but it seems safe to assume she was not one to be placated and insisted on making her own decisions regarding her marriage and agency—notions not commonly acted upon until much closer to our own time than her own.

What values will we choose to enshrine for the next generations? What agency will marginalized voices posses in our society and what will they have to sacrifice in order to attain it? What is the legacy of the ridicule we assign to marginalized and female-identifying voices? How can we reclaim traditionally domestic labor as a valuable means of communication, protest, and empowerment in our charged political climate?

“Female Inheritance” will be on display in the 2019 juried exhibition “Crafting Democracy” in Rochester, New York from August–October 2019 at the Central Library of Rochester & Monroe County. The show is curated by Juilee Decker, Ph.D., Associate Professor, Museum Studies Program and Hinda Mandell, Ph.D., Associate Professor, School of Communication, Rochester Institute of Technology

Sources:
http://www.history.org/foundation/journal/winter11/literacy.cfm
https://salemsecretunderground.wordpress.com/2017/01/05/a-nasty-divorce-west-vs-west/
https://peabodymallwalk.wordpress.com/2017/01/11/nathaniel-and-elizabeth-derby-west-1776-2/
http://www.newenglandhistoricalsociety.com/elizabeth-derby-west-scandalous-1806-divorce/
http://dwightderbyhouse.org/museum/derby-sampler/

Tips & Tricks: Flourish

posted in: Embroidery, Pattern Resources | 0

Each copy of my Flourish pattern, both PDF and print versions, comes with a color chart, stitch map, and some photo tutorials to get you started. In this post, we’ll go into a bit more depth with some additional pointers to help you stitch up this pattern. Are you ready?!

Navigation

  • You can stitch the various elements of this design in any order, but the following guidelines should help you keep things tidy and secure:
    1. For the striped leafs and large five-pointed flowers, I like to stitch the centers first and then the outline/border for better visibility as I work. This also allows shapes to grow outward with less chance of rubbing up against previously worked bits. You could take this approach to the whole piece.
    2. I like working the two elements just mentioned as well as the small rounded petal flowers before working the balloon shaped blooms in the background. This way, I know exactly where I need to add a compensating stitch or two to for tidy edges (without manipulating the feature shapes).
    3. Save the smallest elements such as the lazy daisies, french knots, woven roses, and back stitch stamens until last. Since everything else will be in place, this will provide lots of options for securing your threads on the back.

Stitch Anatomy

  • When working satin stitch (like the balloon shaped petals in this pattern), you’ll get better results by stitching width-wise instead of length-wise. That’s because it’s the shorter route from edge to edge and shorter satin stitches are always more secure and tidy than long ones that tend to start getting floppy at app. 1”+ long.
    Fishbone centers are worked before the slanted satin border. Satin fill work (seen here in peach and pink is worked width wise for a secure result.
  • Another tip for satin stitch is to start in the middle of your shape and work towards one end. Then, come back to the middle and work towards the other end. This will help keep your stitches aligned and shape even.
  • Curious about stitching the “half moon” woven roses? The technique is actually the same as if you were working a full woven rose—the only difference is where your needle enters and exists the fabric between rounds. As in the photo below, you’ll enter just right of the center on the straight edge of the shape, weave in and out of your set-up stitches, and then enter when you get to the opposite side. Each round, you’ll enter and restart on that same right side and work clockwise (you could work counter-clockwise, but for the sake of trying to provide clear directions, I’ve chosen clockwise). Sometimes I like to add a compensating stitch at the outer edge to finesse the final shape (as seen in the final two steps below).
    “Half moon” woven rose (pictured top to bottom, then left to right).
  • The small flowers with five rounded petals are worked in a radiating satin stitch. This photo illustrates how I like to fill these shapes in while maintaining clean angles from petal to petal:
    Setting up guidelines for a radiating satin stitch (pictured top to bottom, then left to right).
  • Be sure to check out my video tutorials for the stitches used in this pattern here in the KHG Arts Stitch Library (I’ll be posting more video tutorials and will be sure to update this post with those links once live). My goal in these videos is not just to show you something, but to break a stitch down to help you understand how and why each functions the way it does.

And now for some final words of wisdom…

  • Compensating stitches are your friend! When working an all-over design like this where multiple elements bump up against each other, adding in a stitch here and there to smooth out an edge or fill an unexpected gap is the name of the game.
  • Looking for extra guidance for maintaining an even edge where the design cuts off in the middle? Try this trick: Thread your needle with some sewing thread (or one ply of cotton embroidery floss) in a contrasting color and take some large basting stitches across the line (extra long back or running stitches would work). Now you have a guideline to help you create a nice clean edge and, because basting stitches are large, they’re easy to pull out and trim away when you’re done.Basted guideline
  • Always remember the “three foot rule.” We spend so much time up close and personal with our projects that we forget to step back where the view is much more forgiving! Odds are, your mistake learning opportunity isn’t visible from there and certainly won’t be to anyone else. Decide what level of perfection makes you happy and embrace it in your work.

You can grab your own copy of Flourish right here in my shop and download the FREE alternate colorway right here.

Happy Stitching! Don’t hesitate to let me know if you’ve got any questions and I’ll update this post with any other FAQs that might come up.

All About That Thread, Part II

posted in: Education, Embroidery, History, Textiles | 4

If you’re new (or even not so new-ish) to the world of hand embroidery and needlework, the variety of threads for stitching can seem overwhelming…so many decisions, so many colors and fibers and weights and textures, O MY. I thought it’d be helpful to break down the basics here, because overwhelming can also mean unending choices to experiment with!

There are actually hundreds of characteristics for all types of thread (crazy, right?), from the manufacturing process to at home uses, so I’ve condensed the most fundamental facts into two posts—you can find the first part right here.

Are you ready? Let’s do this!


There are endless types of sewing threads in this day and age, so here, we’re just going to cover the basics and then zero in on all the other great threads, yarns, and flosses used specifically in hand needlework such as embroidery, needlepoint, mending, and quilting. We’ll take a look at all the main types, different brands, and what makes each unique. Plus, you’ll find a handy list of where to find them at the end of this post (because, honestly, that can be the hardest part!).

There are are six main types of materials used for needlework threads: cotton, wool, silk, linen (flax), metal, synthetics (such as polyester and nylon). You can find these in various thicknesses, textures, manufacturing methods, and of course, colors. Some are made for specific types of traditional handwork, but all can be fun to play with in surface embellishment.


From L to R: Sashiko, Hand dyed Perle Cotton, Perle Cotton, 6-ply embroidery floss, Faux Metallic, and Glow-in-the-Dark


Sashiko
This thread is non-divisible and though white is the traditional color, it does come in others these days. It’s great for embroidery, quilting, and boro mending. After all, sashiko was originally a quilting technique of intricate patterns that has only been repurposed as a surface stitch in recent years. Olympus (in Japan) is the most commonly available type exported to the US. P.S. This is pronounced as “sash-ko,” with the middle “i” being almost silent, according to The Ultimate Sashiko Sourcebook (incidentally a book I’ve been able to learn a lot from and highly recommend).

Perle/Pearl Cotton
This is a non-divisible cotton thread that is wonderful for surface embroidery, some needlepoint applications and sashiko, as well as handquilting (I know some quilters swear by the size 5 thickness while others go for size 8). Valdani (a Canadian company based in Romania) makes a really lovely range of these threads in solids and variegated colorways that are hand dyed and colorfast. DMC offers a fair amount of solid colors, and Brooklyn Haberdashery (New York) creates some really subtly hand dyed small-batch hanks.

Cotton Embroidery Floss
This is the most commonly used type of thread among general practitioners of free-form embroidery. It comes as a 6-ply hank and is made by several manufacturers in hundreds of colors. Some swear by higher-end brands like Aurifil (Italian brand popular with quilters), Cosmo (made by Lecien in Japan), or Sublime Stitching (made by Kreinik in the US). I’ve not found much difference between those and the more widely available ones like DMC (the French Dolfus-Mieg & Co.) or Anchor (based in the UK,) though I would caution against using any generic bargain brands found at big box stores for anything other than children’s crafts as they are of quite poor quality and infuriating to untangle.

Synthetics/Novelty Threads
This category includes glow-in-the-dark, fluorescent, reflective, and faux metallic/synthetic floss varieties (o my!). They can really add some pizazz (to coin a word from my grandma) to a project. Kreinik makes glow-in-the-dark and faux metallic varieties that are easy to work with, but non-divisble. DMC makes a colorful range of faux metallics that are non-divisible, but they kind of fray like crazy while stitching. I guess you just can’t have it all, ya?


From L to R: All Purpose Polyester thread, Cotton Hand Quilting Thread, Merino Wool Needlepoint Yarn, Cotton Needlepoint Yarn


All Purpose vs Hand Quilting Thread
All Purposed threads are just that—while they may contain different amounts of cotton vs polyester, either can be used for hand quilting or basting depending on personal preference (cotton tends to be more visible than poly threads). Thread that is specifically labeled as “Hand Quilting Thread” is coated and has a much more “wirey” hand that should ease wrist fatigue and give your stitches a bit more of a pronounced look. As you can see in the above photo, it definitely has a bit more umph than the poly/cotton all purpose thread. My two favorite brands for either type are Gütermann and Mettler (both German companies).

Cotton and Wool Tapestry/Needlepoint Yarn
These are yarns (thinner than most standard knitting yarns, but thicker than floss) usually made of wool, cotton, silk or poly blends intended for use on rigid canvas for needlepoint. Of course, they can also be used for any kind of surface embellishment, like what we see in contemporary textile arts.


From L to R: Silk, Linen Threads, Hand dyed Crewel Wool, Crewel Wool


Silk Embroidery Thread
Ahh, silk threads! They can be a bit pricier than many of the others here, but they are so lovely to work with and create a beautiful surface sheen. Silk threads have been popular from Ancient China to girlhood samplers and Victorian silk shading, but have been subverted a bit in at-home use by the wide manufacture of cotton floss. It’s still used in many traditional forms of embroidery. Au Ver A Soi is one of the most widely available, and you can also find silk threads from Sajou (both are French) as well as Bozzolo (Italian).

Linen Embroidery Thread
Linen is one of the strongest natural fibers around and while it has the most memory of any natural fiber, it also has wonderfully fluid drape. It gets more absorbent and softer with each washing, is non-divisible, and has great stitch definition. Londonderry offers quality linen thread in different weights and colors though you can also find some interesting vintage varieties and brands that hold up quite well over time.

Crewel Wool
Though made for surface embroidery, the weight and variety of colors of crewel wool also make it useful for mending, especially for wool sweaters where a nylon blend is unecessary. Appletons (a company with a long history in England) is a great go-to brand with a huge range of colors. Weeks Dye Works (US) and Valdani also offer lighter weight hand dyed hanks in subtle and variegated colorways. P.S. Crewel is an old Welsh word for wool. Historically, it has referred to a body of embroidery stitches worked in a certain fashion that was most popular in the 17th century and into the 18th century in the American colonies. Nowadays, it’s mostly a term we use for any embroidery worked with wool.

Gilt Threads
Outside a few specialty workshops, I have to be honest and tell you I don’t have a great amount of experience working with these threads as they are such a highly specialized area. Gilt threads are used in traditional Goldwork that shimmers under light and is mostly used in ecclesiastical, royal, and military decoration. They come in a variety of thicknesses and are actually not made entirely of gold, but rather have a silk—sometimes rayon—core that is wrapped with gold-coated silver. You can find some great sources for these in the links below!

Vintage Threads
Cotton does tend to lose its tensile strength over time more than other natural fibers, but it’s a great thing to have on hand if you do any hand basting—why use up long strands and then throw away perfectly good new thread?! Many types of cotton, wool, and linen threads are no longer manufactured, so you can find some interesting textures and thicknesses in colors that may not be as “pinterest-worthy” today. Thicker varieties, like the carded ones below, were most likely intended for mending, tatting, or lacework. Your best bet is to place them in the freezer for a bit to naturally ensure there are no bugs/bacteria and experiment with them for contemporary surface embellishment. Let’s be real though, they’re also just beautiful, inspiring, and a great window to the history of the textile industry!


Looking for quality thread sources? Here are some shops I like*:
Your brick & mortar LNS (local needlepoint store)!
Thread Gatherer—lovely silk
Thistle Threads—Gilt and other historic thread types and colors
Linladen—for vintage linen threads
Purl Soho—soooo many hard to source brands including silk, linen, and wool
Weeks Dye Works—naturally dyed crewel wool
Sarah Homfray—Gilt Threads
Berlin Embroidery Designs—Gilt Threads
Sublime Stitching—cotton floss in great contemporary palettes + Sajou/Au Ver A Soi products
Big Box craft stores—I know, I KNOW, but you can find an accessible and huge range of colors at some of the best prices on brands like DMC, Anchor, Mettler, and Gutermann
Brooklyn Haberdashery—for naturally dyed and vintage threads

*No advertisement, I’ve just used them and had good experiences with each


I hope you find this useful and I’d love to hear from you. What are your favorite types of thread/floss/yarns to work with and where you’ve been able to find them?

All About That Thread, Part I

posted in: Education, Embroidery, Textiles | 0

If you’re new (or even not so new-ish) to the world of hand embroidery and needlework, the variety of threads for stitching can seem overwhelming…so many decisions, so many colors and fibers and weights and textures, O MY. I thought it’d be helpful to break down the basics here, because overwhelming can also mean unending choices to experiment with!

There are actually hundreds of characteristics for all types of thread (crazy, right?), from the manufacturing process to at home uses, so I’ve condensed the most fundamental facts into two posts—below you’ll find an approachable guide to understanding basic terms you’ll see when you go to buy your threads. In Part II, we’ll take a deeper dive and look at several varieties, what makes each one special for particular applications, and where to find them.

Are you ready? Let’s do this!

Divisible vs Non-divisible
Divisible threads, like 6-ply embroidery floss are just that—the individual strands, or plies, can be separated so that you can choose between using a thinner or thicker piece to achieve varied effects (think about less strands for pushing elements into the background of an embroidered image and thicker strands for the foreground). Perle cotton is a prime example of a non-divisible thread that has many uses including “big stitch” hand quilting and embroidery. Be aware though—it’s non-divisible structure makes it less than ideal for split stitches where the needle needs to break through the fibers.

Gassed/Gazed
This is a manufacturing term that refers to the process of passing spun cotton fibers through a flame (at very high speed) in order to burn off the fuzziest bits, making for a smoother strand that attracts less lint and static. If you look on the spool and see the term “silk finish” or “polished cotton,” this means it has been gassed, and not that there is any silk content. Kinda cool, huh?!

Glazed
You’ll find cotton sewing threads intended for hand quilting bearing the term “glazed” or “coated.” It means that the spun fibers have been treated with a coating of industrial wax, resin, or starch that gives the thread a sturdier, smoother feel, making for strong stitches while still being easy on the wrist during extended stitching.

Memory
Does thread have a memory? Indeed it does! Do you have some wool, cotton, or linen fabric, yarn, or thread in your stash? Try holding each and pinching the strand or fabric. Linen, and some cottons, will retain the pinch mark or wrinkle and this factor is known as the fiber’s memory. Wool, having a greater amount of twisted spring to its structure, will bounce back much more easily, so we can say it has less memory.

Mercerized
Mercerisation (named for James Mercer who is credited with developing the process in England, 1844) is a way of treating threads with an alkali solution. The fibers are then better able to absorb dye and water which means they are brighter and more resistant to washing over time. It also gives them a smooth and lustrous finish that tends to resist lint and mildew more than unmercerized threads. Most sewing thread is mercerized whether the label says so or not.

Tensile strength
This word can be used to describe the tendency of any material to break under tension. New threads will have a greater tensile strength than old ones, which break down as they age/are exposed to the damaging effects of sunlight.

Thread vs Floss vs Yarn
These terms can often be used in subjective, overlapping ways. Essentially, yarn is any natural or man-made fiber that’s been spun into a long and continuous strand that can be used in a variety of textile and needlework production. Thread and floss are, technically, simply types of yarn that are specifically intended for sewing and embroidery, respectively.

Twist
As fibers are manipulated into yarn and thread, they can be twisted to different degrees. Thread that is too heavily twisted will loop back on itself and make for a headache inducing snarl. Threads with too little twist will easily fray and disintegrate under pressure. Depending on the manufacturing process, fibers can have an “S twist,” which means they entwine in a right-facing or clockwise direction, or a “Z twist,” that entwines in a left-facing or counter-clockwise direction. It can be helpful to observe which way a yarn or thread twists when attempting to untangle it!

Variegated vs Speckled vs Tonal
You will most often see the word “variegated” when looking at embroidery floss and sometimes modern knitting/crochet yarns. It means that any given individual skein or hank has multiple colors in it, one blending into another along the length of the strand. Variegated threads can contain many different colors or flow from one tone to the next. In this way, variegated threads can be tonal in nature, but don’t have to be. Speckles, which are a popular and newer method for applying color to yarns for domestic knitting, are scattered across the surface of the fibers in a completely random array.

Weight
If you’re talking about yarn for needlepoint, tapestry, knitting, or crochet, you’ll need to know the different weights, or thicknesses, that yarn comes in. From thinnest to thickest, here are the categories: lace, fingering, sport, DK, worsted, aran, bulky, and super bulky (or chunky).

Got any other terms you’re curious about or stumped on? Let me know in the comments, and we’ll do some sleuthing! Stay tuned, part two is on it’s way…

Tracing Nocturnal Blooms Through History

posted in: History, Textiles | 0

The new KHG Arts embroidery pattern “Nocturnal Blooms,” is inspired by my love of big florals, stark contrast, and one of my favorite design trends of recent years–dark florals.

Floral motifs in textiles might bring to mind frilly, flouncy, girly numbers like pastel Easter dresses or perhaps small-scale calico prints. But when those flowers are set against a pitch black background, the cloying saccharine is swept away and we are left with the daring conflux of delicate and dark, vigor and void. For me, that juxtaposition is where things get interesting!

From L to R: Andrea Gentl and Julia Stotz’s take on dark floral photography

While it may seem that so called “dark florals” or “moody blooms” are a recent trend occurring in floral and food photography or on the runway, the aesthetic stems from a long tradition of dramatic chiaroscuro in historic textiles, dress, and art. I love a good origin story, so let’s take a look, shall we?

From L to R: Still Life of Flowers in a Vase, Jan Davidsz, de Heem, 1650–1683, Oil on Panel, Rijksmuseum, Amsterdam; Still Life of Roses, Carnations, a Tulip and Other Flowers in a Glass Vase, Maria van Oosterwijck, 1630–1693, Oil on Panel, Private Collector via Sotheby’s.

The most direct link can be found in the floral still life paintings of the Dutch Baroque golden age. As an affluent merchant class grew in the Netherlands, art took on new subjects that would appeal this widening consumer base. Many of these individuals would have been devout Calvinists who traditionally shunned overt embellishment and favored subdued black garb. Though they embraced an ideal of respectable morality, they were also quietly eager to make known their rising status in society. This gave way to a rise in the production of fine art and home goods that were seen as tasteful and small, but also precious.

Floral still life paintings are an excellent reflection of that trend. The stark contrast of the brilliantly colored blooms against the subtly lighted recesses of their surroundings, speak to an acknowledgement of violent beauty and the fleeting nature of humanity. The flowers are presented in their prime, but the viewer understands that decay lurks just beyond the frame. This showcase of wealth could be deemed permissable because the luxury item itself was tempered by the message the work carried that was bold, yet in a way, pious.

From L to R: Embroidered Folk Apron, Hungarian, Fourth Quarter of the 19th Century, Brooklyn Museum Costume Collection at The Metropolitan Museum of Art, NYC; The Unicorn in Captivity, South Netherlands, 1495–1505, The Cloisters at The Metropolitan Museum of Art, NYC.

If we dig a bit more, we can find a clear preoccupation with the theme over the course of centuries. We find the proliferation of millefleurs in the woven tapestries of northern Europe—the “thousand flowers” fashioned in a helter skelter arrangement upon a dark ground meant to conjure grass or the depths of a forest scene. The Unicorn tapestries of The Cloisters show off this style to great effect (shown above on the right), where we see the flowers spreading across the work without overlap or any illusion of depth. The dark ground serves that purpose in and of itself.

This style would later come to influence William Morris and, in turn, many of the textile prints we know and love from Liberty & Co.

I also found a lot of inspiration for my “Nocturnal Blooms” design in the rich folk embroidery traditions of northern and eastern Europe. Brightly colored blooms upon black cloth seem to pop up in the folk dress of many of these cultures and I find myself drawn to that “old world” aesthetic. Historian Linda M. Welters of the University of Rhode Island suggests that, “use of the primordial colors of red and black (blood and earth) further connect folk dress with pre-Christian religious practices.” Isn’t it fascinating that both the Calvinist Dutch and pre-Christian folk traditions seem to overlap here, even just a bit, in their embrace of this aesthetic and the instinctual nature of the ideas that it invokes?

From L to R, T to B: Dolce and Gabbana, Fall 2012; Dries Van Noten Spring/Summer 2014; Valentino Ad Campaign, 2013.

As the 2010’s rolled into view, we saw a wave of haute couture designers creating fashions inspired by the dark floral motif. Dolce and Gabbana debuted a collection in the fall of 2012 that referenced Dutch masterworks and cherubic angels that seem to have flown in directly from an Italian Baroque canvas. Notably, Dries Van Noten and Valentino also pulled upon the period for inspiration in their 2013 and 2014 collections, respectively. I love how the Valentino ad (above) features both a still life, reminiscent of Dutch paintings, as well as a dress with jacquard-like fabric crawling with millefleurs.

Do you have any favorite pieces of art or fashion that have influenced your own style or craft aesthetic? I’ve been collecting further examples of the dark floral trend right here on pinterest.

Sources:

Kay-Williams, Susan. The Story of Colour in Textiles: Imperial Purple to Denim Blue. Susan Kay-Williams. London: Bloomsbury, 2013.

Kleiner, Fred S., Christin J. Mamiya, and Richard G. Tansey. Gardner’s Art Through the Ages, Eleventh Edition. Fort Worth: Harcourt College Publishers, 2001.

The Metropolitan Museum of Art. The Cloisters: Medieval Art and Architecture. New Haven and London: Yale University Press, 2005.

http://www.metmuseum.org/

Parry, Linda. William Morris: Textiles. London: V&A Publishing, 2013.

Welters, Linda M. Eastern Europe Folk Dress. http://fashion-history.lovetoknow.com/clothing-around-world/eastern-europe-folk-dress

Save

Save

Save

Save

Save

Save

Save

Tips & Tricks for the HL ABC Sampler, Part II

posted in: Embroidery, Pattern Resources | 5


This is the second in a two part “Tips & Tricks for the HL ABC Sampler” series. Click here for the first post.


Now that we’ve had an overview of how to get started with the Hand Lettered Alphabet Sampler, let’s get down to specifics! In this post, you’ll find helpful pointers for completing each letter in the sampler. These are not strict rules that you have to follow or stitch tutorials (you can find a growing library of those right here though!). Rather, they are intended as instruction to aid you in achieving particular effects similar to the original sample—the kind of details related to applying a particular stitch to a particular shape or line, color considerations, and more!


Letter Specifics


A—Start by outlining the entire letter. I used stem stitch on the parts that would still show at the end and split stitch for the parts that would get covered up with padding. This is because I can work split stitch faster and it provides an even surface for your padding to sit on. I worked several layers of padding to achieve the height shown in the sample, alternating the direction of each successive layer of padding to avoid creating any gullies for floss to pile up in due to natural variations in tension.

B—Work the french knots after you’ve worked the quaker stitch on the rest of the letter so that you have something to secure your tails to on the back.

C—In this case, you may find it easier to work the alternating/striped satin stitch first and then apply the outline, in order to help cover up any unevenness along the edges.

D—For a more defined shape, work the outline of this letter first and then fill it in. You get to determine the density of the fill. I ended up using 1.5 skeins of floss, so make sure to have plenty of whatever color you choose!
E—By completing the outline first, and then the isolated stitches that embellish the center of the letter, you’ll have more on the back of your work to secure your floss tails to. Use just three strands and only one or two wraps in your french knot so that they do not overpower the rest of the design.


F—Use three strands to go over the complete outline of this letter. Then, with a full strand, come back and go over the first (1, pictured above) of the three thicker parts, laying another layer of stem stitch over the first. For the other two thicker parts (2 & 3, pictured above), you’ll want to add a couple layers of padding before finishing off each one with some satin stitching that mimics the slant of the stem stitch.
G—Laid stitch comes out looking much like satin stitch, but is worked a bit differently. Though it has a less refined edge, it provides a quick coverage option that requires much less floss and is therefore a handy one to add to your toolbox.
H—Did you know that cross stitch is just one of many embroidery stitches? It can be worked on a gridded fabric, but doesn’t have to be! Start at one corner of this letter and work from top to bottom, side to side (or vice versa since the letter “H” is the same no matter which way you turn it).


I
—This can often be one of the trickier stitches to master, so give yourself some practice first to get comfortable with the concept. It can be helpful to envision the way a wall of bricks lay offset from each other as your stitches will grow in the same way! Even spacing is the key to this stitch, especially in your first row as sets up the entire grid.
J—If you want to use a few colors for this letter, as I did, try choosing ones with high contrast to help draw attention to the 3D illusion of this drop cap. Use just three strands and only one or two wraps in your french knot so that they do not overpower the rest of the design.
K—As with the “D,” it will be easier to achieve a defined shape by going around the outline of this letter first and then filling it in. Larger french knots will go faster; smaller knots will give a more consistent texture and line—the choice is up to you!
L—Make use of the line running through the center of the “L,” to create a middle axis that curves along with the shape of the letter itself. Allow for denser spacing in the concave part of the curve, and less in the convex part of the curve for easier navigation and smoother results.
M—This is another stitch that may look impressive, but is quite easy to accomplish! Be sure to use two colors with high contrast if you want the tacks to really show up.
N—Straight stitch was originally used for the middle of the N, but you can use any outline stitch you like here.
O—I prefer working this letter from the center out, alternating where I begin each round of chain stitches so that the points where they join are not too obvious.
P—You can complete the line running up the side of the “P” first as back stitch and then come back in to add the isolated chain stitches or work them altogether as you go from bottom to top. Experiment to see what approach you prefer or which might give you a smoother result.
Q—This letter employs traditional satin stitch worked in a horizontal direction for the main body of the letter and slanted satin stitch for the serif. It can be helpful to use just a  scant bit of stem stitch for the thinnest parts of the letter at the top and bottom as well as the tips of the serif.
R—Seed stitch is worked very randomly so that it spreads in a very organic manner across the surface of your work. You can work it evenly spaced across the entire letter or from dense to thin as in the sample. Each stitch should be approximately 1mm long, turning in a different direction from its neighbor. Sometimes called rice stitch, it can be helpful to imagine how the contents of a bag of spilled rice would look to envision this stitch.
S—Use a full strand and three complete wraps for your french knots in this letter to achieve a plush result that fills the space nicely.


T—The original photograph of the sampler shows an earlier version of this stitch that has since been updated for ease of use (I’m always working to try and make things better!). You can refer to the picture above for better reference and try stitching it in this order: solid sections of laid fill first, then the lines of back stitch that will serve to secure those in place, and finally the running stitch and the outline. Rather than demonstrating a specific stitch, this letter shows you how you can combine stitches to achieve a particular effect–plaid!
U—Follow the navigation suggestion in the photo below for this letter. You can always stitch a letter up from any direction you like, but it can be useful to find the most efficient route to make the best use of your supplies and time.


V—The serifs at the top of this letter can be worked in a simple satin stitch just until they taper towards the straight line. From there, switch to stem for the remainder of the line. Take your time with the leaf and consider how the axis of your fishbone stitch can curve to follow the shape of the leaf.
W—I originally used a straight stitch for the middle of the letter (the upside down “v” part), but you could use any outline stitch you like here. This is an uncommon stitch nowadays, but offers a really neat result that is simpler than it may seem at first.
X—Work the grid first, then the overlay of isolated chain stitches, and finish by outlining the letter to give it a polished border. The chain stitches sit within the squares of the grid, but are not stitched thru it.
Y—The long and short shading stitch used for this letter is one that grows very organically. Each successive stitch can overlap the one before or next to it by approximately half a stitch length. This can certainly be varied as needed. Using stem stitch on the outline at the tightest points of the curve as well as compensating stitches can help give you a more refined result. You can choose as few or as many colors as you’d like to form the gradient, swapping them in at whatever points you choose. The closer your colors are to each other, the more smooth the transition between them will be.
Z—Instead of using split stitch to complete the entire letter, you can use a straight stitch for each serif, giving them more definition. See the photo below for a helpful navigation suggestion.

Save

Save

Save

Save

Save

Save

Save

Save

Save

Save

On My Shelf: Textile Inspired Storybooks

posted in: Education, On My Shelf | 0


When a child learns to stitch at a young age, they are able to develop confidence as well as fine motor, practical life, and problem solving skills. They learn that it’s OK to make mistakes and about the joy to be found in creativity as they grow in independence and positive self-expression. Whether a child explores sewing, knitting, embroidery, weaving, or other textile-based art forms, each of these mediums have the power to aid in cognitive and sensorial development at the most crucial stages of development for young learners.

Sitting down to learn from, craft with, and teach a child hands-on life skills is an amazing experience. Reading is another wonderful way to reinforce and contextualize these lessons. Today I’m sharing some of my favorite children’s books that will help to do just that. I have fond memories of some of them from my own childhood and have happily discovered others as an adult.


As an adult, I’ve never grown tired of beautifully illustrated storybooks and the artwork in these books is no exception. I want to highlight the artistic depth of these books as well as the fact that textiles offer us a pretty useful bridge between cultures and time periods.

These books aren’t “just” about fabric, yarn, or making things. Many explore a wide range of subjects that can be more difficult for young learners to grapple with in isolation. These include poverty, family relationships, slavery, loss, recycling, bullying, compassion, war and human rights, imagination, economy, and love, to name just a few. For me, that gets at exactly what I find so compelling about textiles! They seem like an innocent enough thing, but despite or perhaps even because of that, they allow us to connect to so many other experiences and ideas that span time and cultures.

Are there any other textile-related books that you think belong on this list? Let me know which ones you know and love!


Cloth Lullaby: The Woven Life of Louise Bourgeois—Amy Novesky and Isabelle Arsenault
This is a stunning book about the artist Louise Bourgeois and how a life in textiles shaped her work. A fellow teacher brought it to work one day and I was blown away by the thoughtful illustrations and powerful message. It is certainly worth checking out whether you are younger or older!
Key Themes: Memory, fine art, identity, family relationships, purposeful occupation, material culture


The Hundred Dresses—Eleanor Estes and Louis Slobodkin
When we talk about textile and fashion history, it’s impossible not to consider the fundamental concept of having or not having. The lovely illustrations of Slodbodkin and sensitive storytelling of Estes create a classic in this story about a young immigrant girl whose brilliant dreams of 100 dresses are mocked by her classmates. It confronts big issues in an elegant and compassionate manner that makes it a pleasure to read.
Key Themes: Poverty, bullying, style identity, fashion design, immigration, morality


A Hat for Mrs. Goldman: A Story About Knitting and Love—Michelle Edwards and G. Brian Karas
This book gets right to the core of what makes the knitting community such a rich and wonderful place and highlights the imperfect perfection of handmade. It tells the story of Sophia who makes it her mitzvah to help Mrs. Goldman—an older woman in her community who spends so much time knitting things for others, that she ends up hatless herself. It’s a great book if you have a young learner in your life who is just beginning to strike that balance between the joy and frustration of trying their hand at something new (plus it actually includes a knitting pattern!).
Key Themes: Community, kindness, creative acceptance, inter-generational relationships


The Patchwork Quilt—Valerie Flournoy and Jerry Pinkney
“A quilt won’t forget, it can tell your life story”
I remember checking this book out from the library over and over again as a young child. It may be personal bias, but the illustrations feel warmly nostalgic and rich. Like many, I cherish the patchwork quilts made by my grandmother using bits and pieces of all the clothes my mom grew up wearing and I cherish this book too. The story shows the growth of the quilt as each family member and their memories are “added” to it.
Key Themes: inter-generational relationships, material culture, craftsmanship, heirlooms, economy, health and aging


A New Coat for Anna—Harriet Ziefert and Anita Lobel
This book tells the story of Anna and her mother as they work to survive and keep warm in post-WWII Europe. The pair set out to procure the raw materials and skills to make a new coat for Anna. I love the way it breaks down the process of creating just one garment and the meaning and value in each step that we may overlook in times of fast-fashion.
Key Themes: War and poverty, cultural identity, value of material goods, craftsmanship, textile production, gratitude


I Had a Favorite Dress—Boni Ashburn and Julia Denos
If you have a young sewer or fashionista in the house, this book presents a fun way to get them thinking about incorporating the tenants of reusing, reducing, and recycling into their projects. After all, no hobby is exempt from environmental effects and outcomes.
Key Themes: Creative reuse, mother–daughter relationships, style identity, economy, environmental awareness


Extra Yarn—Mac Barnett and Jon Klassen
Extra Yarn takes an imaginative look at how creativity in action can alter the landscape (and mindscape!) around us. It’s message is empowering without lacking in narrative interest and it is delightfully illustrated in the contemporary style of Klassen.
Key Themes: yarn bombing, imagination, creative vision and value, humor


The Keeping Quilt—Patricia Polacco
This book is similar to Flournoy’s The Patchwork Quilt in some ways, but equally valuable in its own right. It presents a more expansive view of many generations and how a quilt is made and passed down, facilitating the translation of traditions and identity for an immigrant family. Only particular bits of textiles are drawn in color and this brings the quilt’s critical role into sharp relief. Be sure to check out Polacco’s other works including Fiona’s Lace.
Key Themes: Immigration, heritage and identity, material culture, heirlooms, family relationships, inheritance, economy, traditions


Stitchin’ and Pullin’: A Gee’s Bend Quilt—Patricia McKissack and Cozbi A. Cabrera
This book combines poetry and images that provide kids with a springboard for understanding and connecting to the art of quilting, and in particular, the beautiful quilts of Gee’s Bend. It talks about the women who made them, what their lives were like, what goes into a quilt. I love finding resources like this that allow young learners to connect with exhibitions or any body of work that they might otherwise not be able to engage with.
Key Themes: Community, heritage and history, memory-keeping, design, craftsmanship, inter-generational relationships


Save

Save

Save

Save

Save

Save

Save

Save

Save

Save

Save

Tips & Tricks for the HL ABC Sampler, Part I

posted in: Embroidery, Pattern Resources | 0
Students at JP Knit & Stitch in Boston showing off their HL ABC samplers in progress


This is the first in a two part “Tips & Tricks for the HL ABC Sampler” series. Click here for the second post.


I originally designed this sampler as an instructive tool that I could use in my teaching practice. There are lots of great patterns out there that can be used to teach the basics, but not much in the way of contemporary designs that show off the hundreds of advanced stitches out there. As a result, they’re fading from our popular lexicon. As a textile historian, It means a lot to me to be able to create and contribute something that helps keep these stitches alive and well!

It’s always a treat to see the different ways that everyone stitches the sampler up, both in class and from afar. Today I’m going to share with you a few tip & tricks to make it easier for you to stitch up your own version at home.


All About that Floss
There are 26 letters in the alphabet, so at the very least, you will need that many skeins of floss if you choose to assign each individual letter it’s own color. For many of the letters, I have used more than one color; for me this came out to 37 colors in total. I used 6 ply cotton floss, but you could also try stitching this up in wool, silk, mercerized cotton, or linen, to name just a few. The choice is up to you! If you’d like to use the same colors I did in the sample, you can refer to the Color Guide on my Resources page (a free download!).


Fabric Types
If you are transferring this pattern from the PDF rather than working with the pre-printed copy, you’ll want to read this! Linen is the commonly preferred type of fabric to stitch on these days, but for this sampler, I recommend using a lightweight canvas (a cotton or a linen/cotton blend will do). Why is that? Well, when many of the stitches you see in the sampler were most popular, the commonly preferred type of fabric for stitching on was called fustian or ditty cloth. These substrates have since gone out of fashion, but modern day canvas with a twill weave is quite comparable. PLUS it supports the heavy fill work of these stitches really beautifully. Try it, it’s great to stitch on! Plain weave canvas and linen will also work, so I encourage you to experiment and see what you prefer.


Where Do I Start?

This sampler starts with basic outline stitches and builds upon them to help expand your stitch vocabulary with intermediate to advanced outline, laid, knot, detached, and fill stitches. If you’re feeling unsure about where to start, I recommend stitching the letters in the following order so that each one serves as a foundation for the next:

U, N, R, H, Z, I, Y, M, C, G, Q, A, F, B, S, O, P, E, J, K, T, D, X, W, V, L


Navigation

It’s usually best to start from one corner or end of a letter, working towards the opposite side. Whether that is top-to-bottom, side-to-side, or vice/versa, matters less. It may be different for each person, but try to think of it in terms of driving a car—what is the most logical and/or efficient route from point A to B without backtracking or running out of gas (or in this case, floss)?

For the letters K and D, I recommend stitching the outlines first to give your work a more defined edge. From there you can fill in to achieve your desired density.

If you are practicing these stitches for the first time, go easy on yourself and take pride in the process of learning and making without too much focus on this aspect. We can always work to improve navigation efficiency and the cleanliness of the reverse side of our projects, but we may not get to those projects if we embrace the onerous burden of perfection as beginners. Everyone was a beginner once!


Care
How can you care for your sampler once it’s done? If you want to wash it before framing, I recommend hand washing with gentle detergent. Just be sure to note—red, purple, and blue colored flosses can be less colorfast than others, so testing those skeins first can save you headaches down the line. Never put hand embroidered pieces in the dryer; always let them air dry! Once dry, place your piece wrong side up over a towel on an ironing board. The towel will act as a cushion for the stitches as you iron, working out wrinkles without crushing all your beautiful work. To keep it in good condition, go over it with a low-suction vacuuming every so often. This is a much gentler way to care for textiles that you want to last for a long time, rather than constant laundering.


Leave me a note in the comments section if there are any other questions you have or things you’d like to know more about. I’ll respond there and, if there are any frequently asked questions, I’ll be sure to update this post for everyone.

Save

Save

Save

Save

Save

Save

Save

Save

The Hand Lettered Alphabet Sampler—Now in PRINT!

posted in: Announcements, Embroidery, shop news | 0


Today is the day guys! Printed copies of my Hand Lettered Alphabet Sampler are here and ready for you to stitch up!

Inspired by my work as a graphic designer, I created this sampler using hand lettering techniques to create a classic needlework sampler with a mix of vintage charm and a freshly modern flair. Each letter is a uniquely styled drop cap, carefully rendered to show off 29 different stitches and stitch combinations. I included all my favorites, some that you may be familiar with and others that I wanted to help keep alive for years to come! Because it’s chock full of so many, this pattern is useful learning tool to stretch your skills and you end up with a beautiful result.

KHG Arts patterns have always been available as easy digital downloads, but it’s been a longtime goal for me to be able to offer my patterns in a tangible format too, making them more widely available and convenient to use. I’m thrilled to be able to finally share the first copies with you and am looking forward to being able to offer several more designs in print and kit form moving forward!

#handletteredalphabetsampler


This sampler has been printed onto lightweight cotton canvas and individually packaged to include two stitch tutorials to get you started, a list of other instructional resources, a materials list, and comprehensive stitch map. Why canvas you might ask? It better supports the weight of these filled crewelwork stitches and is most similar to the type of fabric historically used for this style of embroidery. I wanted to offer an option customized just for this pattern—something comparably sturdy that I like stitching on myself— and am so pleased to be able to make it available to you for this sampler because I want to create things that are beautiful and useful; things that can earn their space in my home and yours.

Also, let’s just take a moment to savor the wonderfulness of having this whole pattern all set out on the fabric for you–no tracing! no ironing! Just stitching! HOORAY!

Pick up your own copy in my shop and check out a growing library of companion stitch tutorials right here. Have any special requests for stitches you’d like to learn about? I’m busy at work filming more and would be happy to push any requests to the top of my list!


P.S. Would you like to see KHG Arts patterns available at your local stitch shop? Be sure and let them know! I’ll be making printed copies of this sampler available for wholesale and am looking forward to making more designs available in print and kit form in the future!

What Does Craftivism Look Like Now?

posted in: Craftivism, Textiles | 0

Me and Mckenzie Mullen @emtothethird knitting our fingers off before the march.

Happy International Women’s Day!

As I join many in donning my pussyhat in honor of this day, it seems like a fitting moment to revisit and reflect upon the role and nature of craftivism within and in response to our current political climate. In my original post, Passion and Purpose/Pink and Pussyhats, I explored some ideas about the history and validity of this form of active protest. Since the Women’s March in January, many throughout the nation and beyond continue to don their own hats and look for other ways to raise their voices and get involved in their communities. Craftivism, due to its non-violent and hands-on nature, seems especially accessible and, whether they are familiar with its history or not, I think many have been spurred on by the Pussyhat Project and are wondering—what comes next? What might this kind of action look like in the long-term? What impact can we have as people who work with our hands?

What Is Craftivism?
As someone whose work is at the intersection of textile history and contemporary craft, these questions interest me greatly. In order to better answer these questions, I think it can be helpful to learn a bit about craftivism, it’s strengths, as well as potential goals and outcomes.

From wartime knitting drives to peaceful commemorations and artistic protests, the history of bringing together craft and activism is a long one indeed. The term itself wasn’t coined until 2003, according to Betsy Greer, the woman who has spearheaded the 21st century craftivism movement. Greer defines craftivism as, “a way of looking at life where voicing opinions through creativity makes your voice stronger, your compassion deeper & your quest for justice more infinite.”

As it has gained traction, many contemporary forms of craftivism have pulled equally from the refinement of traditional domestic arts as well as the harshness of political and cultural strife to address the far-reaching effects of climate change, social justice infringements, capitalism, and misogyny. It uses knitting, embroidery, and all forms of needlework and textile-based artforms in small- and large-scale public ways to draw attention to issues, reinforce solidarity, and allow for non-violent yet subtly subversive creative expression around critical issues.

What Can Craftivism Look Like?
Greer has set out three tenets of craftivism—donation, beautification, and notification. These tenants can help us to think about what shape our actions and outcomes might take as we seek to address critical issues of our own day. Here are some of the ways I think we may be able to put these tenants to work:

Visibility
There are many forms of community and political action; many talents and voices that, together, can affect long-term and large-scale change. One of the greatest strengths of craftivism as a form of political protest, is its potential for creating visual impact, thereby notifying and highlighting areas of need, crisis situations, and marginalized voices, to name a few. So many political differences stem from alternative interpretations of the world around us. The visual nature of craft has the power to spur conversation around such difficult topics and focus on that which might otherwise be ignored. What facts, people, things, or places can you draw attention to? How might we capitalize upon the visual language of craft to do so?

Accessibility and Inclusivity
Activism is a fundamental part of any functioning democratic process. For many, there are overwhelming barriers to taking part however, due to health or economic reasons, systemic impediments against race, gender, age, and ability, (introverts, myself included, wish to make a difference in the world too!). Craft can be practiced both in and outside the home, by individuals and groups. It can be taught and conducted with a range of supplies, both found and manufactured. Craft is for all. Those who practice it are, and should continue to serve as, voices of inclusivity and compassion for anyone who wishes to take part. We can ask ourselves—how might we make craft-based forms of activism more accessible? Could this community activity or political activism be prohibitive to anyone due to their lack of privilege in any particular area? How can the things I make with my hands help someone else feel included?

Solidarity and Support
It can be frustrating to feel as if the only things we are capable of as individuals seem so small compared to what we face in life. Personally, I believe that it is often the small things, especially when amplified by consistency and solidarity, that can result in the biggest and most sustainable change. One of the hurdles to sustaining successful grassroots action is often found in maintaining involvement and motivation over time. Here is where I think craft can absolutely play a role. Here is where we can build unity and belonging in a world rife with judgement. Here is where we cede the floor to marginalized voices and ensure that as many as possible feel that their voices matter too. Though it may seem small (or denigrated as “women’s work” alone), acts of craftivism can serve as powerful messages of strength, hope, positivity, and solidarity whether they become viral or reach just one person.

Positive Social Change
The process of creating handmade objects is often much more transparent and achievable than factory-produced goods, therefore those items can carry a greater sense of authenticity and purpose. When we are able to apply these same actions and their concurrent values to community and political activism, we can begin to shape a more meaningful message and critical dialogue around it. Indeed, there are a lot of incredible organizations out there that you can get involved with (Days for Girls is one of my personal favorites). As third-wave feminists, perhaps another fitting way that we can affect  change and offer practical aid for causes we care about, is to put our skills to good use by creating handmade goods of high-quality craftsmanship, and donating the funds from the sale of those goods to non-profits that can, in turn, advance legal action or legislative reform. This allows us to amplify a message or cause that may, initially, seem like it would not necessarily directly benefit from craft.

The Way Forward
The short answer is that craftivism can look like a lot of things. It may look different for different people because it’s very personal. It can look like people coming together to rally and march in pink hats, holding a knit-in, making signs and items of support for those who need it, donating useful items to affected groups throughout the country and within our own neighborhoods, or sharing a crafty skill with another to empower them. I hope it can reflect the values outlined here. As we move further beyond the 2017 Women’s March, I hope that we can continue to think about what continued action can look like; about the critical foundation we build those actions upon.

I’ve included some resources below that I’ve found helpful along the way and hope that sharing this may help you find your own voice through craftivism. I would love to hear from you—what do you think craftivism can look like in our current climate? How can it have a greater impact? Do you have a project in mind that you are interested in building participation around? Please join the conversation in the comments section and let’s keep talking!

Resources
Craftivism.com

Craftivism: The Art and Craft of Activism by Betsy Greer

Knitting for Good!: A Guide to Creating Personal, Social, and Political Change Stitch by Stitch By Betsy Greer

Craftivist Collective

New Craft Artists in Action

Church of Craft

10 People Who Use Crafting for Activism

Craft Activism: People, Ideas, and Projects from the New Community of Handmade and How You Can Join In By Joan Tapper, Gale Zucker, and Faythe Levine

Feminism and the Art of “Craftivism”: Knitting for Social Change under the Principals of the Arts and Crafts Movement by Micaela Hardy-Moffat

Craftivism—An Introduction by Betsy Greer

Yarn Bombing: The Art of Crochet and Knit Graffiti by Mandy Moore and Leanne Prain

Save

Save

Save

Save

Save

KHG Arts Stitch Library: The Trellis Stitch (Video)

posted in: Embroidery, Stitch Library | 0


After navigating some technical issues and a very eventful past year of teaching, I thought it was high time I dust off the equipment and get back to filming regular stitch tutorials for you!

Today, I’m sharing the latest installment in my Stitch Library series, a tutorial on the Trellis stitch. This is an intermediate level stitch that creates a latticed grid of laid filling (as opposed to functioning as an outline stitch). The grid lines actually lay along the top of the fabric, only passing through it at distant entrance and exit points. For this reason, you may also have heard it called lattice work or square laid filling. Traditionally though, I most often encounter it as “Trellis” stitch, so that is the name I am using here. It comes to us from a body of stitches that are used in traditional Crewel work, a type of free-form surface embroidery that gained popularity in the Jacobean era in Britain and on into the later 17th and 18th century in pre- and post-colonial America. Though many may now think of Crewel as only a style of embroidery, the word “crewel” actually refers to the traditional use of wool during this period of embroidery work (the word derives from an old Welsh word for wool, “cruell”).


Example2On the left, you can see where I’ve used a basic variation of the Trellis stitch for part of the snowshoe fill and another variation with french knots in each of the grid squares for my Into the Winter Woods pattern. On the right, I’ve again used the most basic variation of this stitch for the fill on the traffic light in my City Set pattern.


You can find a lot of wonderful tutorials in books, online videos, and on blogs for basic stitches. For that reason, I’ve chosen to start my Stitch Library series with intermediate stitches like this that may be more difficult to find information and various perspectives on. Though any of the designs in my patterns can be worked in basic outline stitches, you can see in the video and below how I’ve used intermediate level stitches such as this one in my patterns as well, including, The City Set, Into the Winter Woods, and in my Hand-Lettered Alphabet sampler. I’ve always thought it was especially interesting that you could stitch up one embroidery design in so many different ways, depending on skill level and creative vision—I definitely encourage you to explore the variations of this stitch and see how you can combine learned knowledge with creative choice to come up with something that is uniquely your own.

Example1On the left, you can see a variation on the Trellis stitch from my Hand-Lettered Alphabet Sampler pattern. Here, a detached chain stitch has been used to create an overlay of lazy daisies within the grid. In the image to the right, you can see another variation where red french knots fill the coral grid (this is from a limited edition kit I created for JP Knit & Stitch–I’ll update this post with a link when the PDF pattern becomes available).


Are there any specific stitches you would like to see covered in this series? Leave a comment here, and I’ll add it to my list!

Interested in learning more about the Trellis stitch? Here are some resources I’ve found useful:

Jacobean Crewelwork Explained—Royal School of Needlework

Reader’s Digest Complete Guide to Needlework, Ed. by Virginia Colton

Crewelwork by Jacqui McDonald, RSN Essential Stitch Guide Series


Save

Save

Passion and Purpose/Pink and Pussyhats

posted in: History, Textiles | 2

IMG_3097

A few of the pink pussyhats I’ve been working on over the past couple months.


Since early December, I’ve been knitting “pussyhats” and selling pink yarn. Lots and lots of pink yarn. Part of my job is working and teaching at a small LYS (local yarn shop) in Jamaica Plain here in Boston called JP Knit & Stitch, and it’s been interesting to see this effort come to life from this vantage point. It’s had me thinking a lot about the role of knitting and other textiles in political activism; the meaning attached to making something with one’s own two hands that is capable of reaching a wider audience with a wider message.

Last week, Petula Dvorak, a columnist for the Washington Post, wrote a piece criticizing the Pussyhat Project, arguing that such “frippery” can only detract from the more serious issues at stake; that to mix theater with a much-needed civil rights march is a strike against the marchers’ platform before it even hits the pavement.

I remain full of complicated feelings about the use of the word, “pussy,” and acknowledge the general merits of the argument that theater for theater’s sake, when it reaches over-the-top tone-deaf heights, does have the potential to overshadow that which inspires it. But there’s more to the story than the over-simplified argument Dvorak makes. There is passion and purpose here. So much, that I’m sure one simple blog post can not do it justice. Here’s a start though…


The Devaluation of Women’s Work
Some first wave feminists, quite understandably, distanced themselves from the traditional needle arts that women had long been confined to, in order to advance their message and move into the world held out of their reach. The same does not necessarily hold true for many third-wave feminists of the 21st century. Over the past several decades, more scholarly work has been done to clarify the legitimacy of these art forms, and those who’ve practiced them, than at any other time in history. The scholarship is immense and to dismiss handwork as merely an adorably silly pastime concerned only with adornment, rather than a medium for genuine human expression, seems strikingly out-of-touch.

The current handmade movement, born in part from this body of scholarship and cemented in the lives of many by the bleakness of the worldwide economic recession, serves to empower people in the way that it promotes authenticity and individual intention in a world of half-baked plastic. To Make is to have hope that it is possible to shape life into something nearing beauty despite all that remains outside our control. To take that action into the political realm as a Craftivist is a serious form of democratic engagement because it subverts a medium that has traditionally served as a from of oppression, keeping women from engagement in the public sphere. When Dvorak refers to this kind of action as “goofy” and labels it as “frippery,” she devalues female-identifying voices.


An Impact Beyond the March
I think Dvorak may be misconstruing the nature of this particular effort based, in part, on a lack of understanding about what’s going on behind the scenes. You see, it’s not simply about the statement made on the day of the march itself. From where I’ve stood behind the counter, I’ve seen countless people who’ve stepped inside our doors to support a small business that is locally owned by, gasp, a woman of all things. In times such as these when the president-elect boasts about the cheapness of women’s bodies and businesses are applauded for excluding their fellow citizens based on sexual orientation, gender, race, disability, or political/religious affiliation, it has become a political act to seek out and support inclusive businesses under the ownership of oft-marginalized voices.

It’s also been a privilege to help manage a community-oriented space where people are gathering to knit these hats. They see another person eyeing the pink yarn, they end up sitting down to discuss how they came to the project; how it is giving them hope and direction; how this act is connecting them to a wider community of like-minded citizens they can work alongside in the coming years. They share practical, empowering knowledge around craftsmanship, and in the process, have incredibly meaning conversations about our current political climate and what the next steps are. They talk about their grandmothers and how this act honors them. They talk about their children and the world they will work to craft for them.

If any of this sounds silly or trite, I invite you to consider the long history of knitting as a means of bringing people together in times of war and political strife. This current pink-toned undertaking is far from the first of its kind. Consider the prolific role of knitting on the home front in WWII, the felted peace cranes of Japan, the pink yarn-bombing knit by Marianne Joergensen to cover a combat tank in protest of Denmark’s involvement in the Iraq war, or the efforts of early Americans to clothe Revolutionary troops.

In 2006, Danish artist Marianne Joergensen stitched a pink blanket over a combat tank to protest Denmark's involvement in the Iraq war. With volunteers contributing nearly 4000 knitted squares, the power of the piece is in people coming together to send a common message, Joergensen explains.
“In 2006, Danish artist Marianne Joergensen stitched a pink blanket over a combat tank to protest Denmark’s involvement in the Iraq war. With volunteers contributing nearly 4000 knitted squares, the power of the piece is in people coming together to send a common message, Joergensen explains.” (Thread for Thought)


Do these statements really mean less because they take the form of traditional women’s work? Does a message mean less because it is associated with craft and visual communication rather than the written word?


Case in Point
Dvorak references the Suffragist Parade of 1913 in D.C. as a particularly successful event, supposedly unfettered by gimmicks and theater.

Only it wasn’t.

main_900

A successful protest clearly not involving theater: participants perform an allegorical performance near the Treasury Building as part of the 1913 Suffragist Parade in Washington, D.C. (The Atlantic).


The march, organized by Alice Paul, featured, “8,000 marchers, including nine bands, four mounted brigades, 20 floats, and an allegorical performance near the Treasury Building.” Take a look at some of these incredible historic photographs and the visual imagery that helped to rally so many voices around a common platform. Do you notice anything in particular? Apart from the pageantry, one thing that jumps out to me is just how many women are wearing the color white. White, along with purple, yellow, and green gave suffragists across the country a means of unification and common identity, bolstering their cohesiveness, camaraderie, and ability to be seen and heard without the use of one voice or language.


Color and dress, form and pattern, when applied to the human body in a thoughtful manner, can communicate things about ourselves and our values that words can only chip away at. When it comes to crowds, this seems a critical means of convocation that can only be dismissed at great cost. For our own times, neon pink, a fierce and brazenly modern alternative to the bashful “baby pinks” of times past is a bracing and bright shade while still, in the words of the Pussyhat Project organizers, “is considered a very female color representing caring, compassion, and love—all qualities that have been derided as weak but are actually STRONG. Wearing pink together is a powerful statement that we are unapologetically feminine and unapologetically stand up for women’s rights.” In its unrelenting and bracing brightness, it does indeed seem a rather appropriate symbol of reclamation for marginalized genders, faiths, races, abilities, and creeds to unite under as we seek to reclaim space in our national dialogue for integrity, autonomy, and equality.


Save

Save

Save

Save

Patchwork by Hand at the Ipswich Museum

posted in: Announcements, Education, Museums, Quilts | 0

P1030097


As someone with a foot in the worlds of historic and modern textiles, I find great value in being able to draw connections between the two and have long dreamed of being able to teach a class within a museum setting that incorporated modern DIY spirit and materials alongside traditional techniques and historic examples.

I’m pleased to be able to tell you that this dream will now be a reality! I will be teaching a new course as part of the Ipswich Museum‘s Dow Arts Program that starts later this September. The class is called “Patchwork by Hand” and in it, students will be introduced to the fundamentals of hand quilting by creating a baby-sized quilt as they learn to piece, baste, quilt, and bind it by hand. Additionally, we’ll be exploring some of the quilts and sewing related instruments in the Ipswich Museum’s collections for a unique perspective on the history of the art form and it’s importance in New England.

All too often, contemporary practice and historic collections are viewed separately as disparate things, but that couldn’t be further from the truth. In exploring them together, students have the opportunity for a very rich understanding of the nature and value of hand sewing; of the power and peace there is to be found in taking up needle and thread to create something that is both uniquely beautiful, charmingly imperfect, and essential in its usefulness as a finished object.

For students coming from the north shore, I would recommend Loom N Shuttle or Sew Creative as great places to purchase your supplies for class. If in the Boston area, you could also head to JP Knit & Stitch, Fabric Place Basement, Gather Here, or Mercer’s Fabric.

The class begins on September 20th and runs through October 25th, meeting on Tuesday evenings from 6:30–8:30pm. A full description and registration info can be found on my website’s calendar. If you’re on the north shore and interested, I invite you to check it out and join us! You can regis

TO REGISTER: email educator@ipswichmuseum.org or call the museum directly at 978-356-2811


Save

Connecting to the Tribe

posted in: Education | 0

ST.July4 So proud of these savvy, kind, capable, and very funny campers showing off their self-made circle skirts!

This is the third year I’ve had the privilege of leading summer sewing camps for kids, but the first time we’ve run our Style Tribe program which is a full day fashion camp that I’m leading at JP Knit & Stitch in Jamaica Plain, MA. It’s a small yarn and fabric shop that I teach at often and I love it there because community centered creativity and support is as important to them as the quality of items they carry. That’s due in large part to the shop owner, Genevieve Day, who is an incredible woman with a talent and passion for being a force for positive change and collaboration. In designing Style Tribe, we knew the essence of this community should play a big part in shaping a different kind of fashion camp than what is usually offered.

The activities and tone of the program encourages campers of any gender to discover and explore their own personal style identity by empowering them with hands-on skills in crafting their own unique wardrobe as well as opportunities for positive self expression and collaborative fun. This camp takes the emphasis off of keeping up with fashion trends and instead focuses on developing individual confidence and comfort. It’s the kind of camp I wish I could have gone to as a kid.

ST.July1

I was thrilled to see how much camper’s ideas about how and why people make different parts of their own wardrobes were challenged and expanded by the range of guest speakers we had during the week. It was exciting to see how the multiple perspectives opened up our conversations! Campers tried on vintage, heirloom, and handmade clothes, got to see pictures of makers growing up and into their own styles, and made punk style pins proclaiming their own interests and identities.

In gearing up to lead a camp like this single-handed, I know it will be one of the fullest but also most fulfilling weeks of the year for me. It can be a bit of a cliche, but I’ve found that it is absolutely true that if you try to invest openly and honestly in your students, you can learn as much from them as they from you and that’s what helps creates the best kind of environment for positive growth. This group from our first Style Tribe in July was a special one for sure and it was a great experience to be able to introduce them to the possibilities of self-expression and empowerment that come with learning how to craft wearable art with your own two hands.

I wanted to share a few favorite moments here on the blog, as there were just too many to choose from for Instagram alone! I also want to extend a huge thank you to everyone at J.P. Knit & Stitch who helped make this camp a reality and to each of the campers for being so supportive of one another and game for new experiences. I can’t wait for the next session of our Style Tribe!

ST.July5

Save

Explore More.

posted in: Announcements, shop news | 0

KHGarts.badges

Adventures in summer stitching.

I have a new pattern in development (that I hope to reveal later this month!), but was really itching to make something fun and tangible for the shop in the meantime. I’ve collected embroidered travel badges for my backpack since I was a kid and love their vintage vibe; the way they serve as a simple but special memento of places and memories from our wanderings.

I stitched up the three circular badges with outdoor and exploration themes that are near and dear to me (as a girl scout drop out, I was insanely jealous of all the kids who went on to achieve epic badge status), and then decided to go all in and made a bunch of mini pennants too. Because carbs! donuts! books! all the good things! It was fun to come up with color palettes for them and I kind of want to make a ton more with all the funny things I can think up that have nothing to do with traditional sports pennants.

KHGarts.pennants

Show your team spirit!

I love these and hope you do to! Hopefully they inspire your own summer ramblings and hobbies (yes, cheese can be a hobby). They are ready to ship and you can find them in my shop.

Dressing for Show

posted in: Costume Mounting, Events, Museums | 0

DFS.1

Lunch included time to walk the grounds which boasts incredible views looking out and away from the oceanfront property.

In May I had the honor of presenting at Dressing for Show—a special NEMA workshop held at Rough Point—Doris Duke’s oceanfront estate that is owned and operated by the Newport Restoration Foundation.

DSF.2

Myself, enjoying the wonderful setting and two of our four demonstration forms featured on the right.

The workshop focused on the exhibition and conservation of costume and textiles for museums of all types. In addition to a case study-based presentation by RISD Curator of Costume and Textiles, Kate Irvin, my Andover Figures co-creator Camille Myers Breeze and I presented a talk and demonstration on affordable costume mounting using a variety of materials and techniques to illustrate cost-effective solutions. It was really a treat to get to present alongside these women and to hear from others on this topic and I’m grateful to the organizing members of NEMA’s conservator’s PAG for having us.

DFS.4

Ms Duke herself and her glittering closets.

Before the afternoon talks, we had a great behind-the-scenes tour of Rough Point with NRF curator Kristen Costa. The tour highlighted treatment of several prominent textiles within the space including the Flemish tapestries in Stair Hall. Costa also highlighted a host of challenges and successes inside collection’s storage where Doris Duke’s collection of 20th century fashion is housed. My favorite part was getting a peek inside Duke’s double closets though. Set within her dramatic chartreuse, purple, and black bedroom, the closets are organized between formal and casual wear with nooks for hatboxes, shoes, and every little piece of jewelry.

DFS.3

One of Ms Duke’s many swim suits laid out in collection’s storage.

Save

Save

New Storefront + New Content

Muir.ListingFeature

A refreshed and revised storefront is here!

This past week I officially said goodby to my old blog name “the story of kat,” and switched my etsy shop over to be sync with my KHG Arts name. Out with the old and in with the new! I’ve also included listings for patterns and more right in the shop section of this website so you can find them more easily. It feels SO GOOD to have everything looking sharp and working in a consistent way after dreaming and scheming for so long (or at least it felt like an age to me!).

The shiny new coating on my storefront is nice to have, but the best part of this refresh is the value I’ve been able to add to my patterns as I re-release each one to reflect the updated design sensibility. It only made sense to use it as an opportunity to update and expand on their content as well so here’s the lowdown on everything that’s new! Every PDF now includes:

  • Stitched example photos are not only full-color, they are also much larger so you can see more detail
  • Revised and updated information about my two favorite methods for transferring embroidery designs to fabric
  • Three stitch tutorials complete with color photos and text to help get you started as well as some recommendations on where to find more (back stitch, split stitch, and french knots are included)
  • A full-color stitch map that tells you what stitches have been used in the sample for each part of the design
  • A handy color guide with DMC color codes that you can use to determine what colors the original sample was worked in if you want to stitch yours up in the same palette
  • Easy to understand difficulty ratings
  • Basic materials list for completing the embroidery

Here, you can get a glimpse of what the new KHG Arts PDFs look like:

PDF.feature

Newly expanded and revised KHG  Arts PDF patterns are now available!

I appreciate all the feedback I’ve gotten from pattern testers as it’s helped shape these newly expanded versions so much. As of this writing, I only have a few more left to re-release so stay tuned if your favorites have yet to be posted—they should be available again within the next week!

Hitting the Refresh Button

posted in: Announcements | 0


-1

In 2008, I began selling handmade home goods on Etsy. It was a great way to stretch my creative muscles while experimenting with different materials and ideas. It’s been a wild crash course in being a maker and entrepreneur! Eight years on, and I still can’t get enough of the feeling that comes with selling something I sew with my own two hands and being able to share my designs and ideas with others who love to make things too. It feels like the most honest day’s work I can do and I value that a lot.

Other things have changed a lot since then though. I know how I work best and what I do best. I’ve been able to narrow down the types of things I am most passionate about creating and have a better idea about how I want to share them with others. Instead of being a diversion, my shop is now very much a part of my professional life as a textile artist, educator, and collections care specialist.

For these reasons, it feels like the perfect time to take the final step in streamlining my brand. As of next Monday, April the 24th, I’m going to be dropping my former blog name “The Story of Kat” from my Etsy shop and PDF patterns. Newly redesigned PDF patterns will also be available through Etsy as well as my website which is an exciting goal I’ve been working towards for a while! This clarity in name will make rolling out new designs and products simpler and more cohesive (also, the new designs are pretty slick, if I do say so myself!).

As of today, I’ve taken the old PDF pattern listings down. In the meantime, I invite you to take 25% OFF EVERYTHING else in my shop to clear house while I work on switching things over. Use the code REFRESH25 at checkout as these are all items I will no longer be offering after this week!

I want to thank everyone who has supported my growth thus far and helped me to reach this point. I’m looking forward to being able to share the great new content and plans I have for this new phase of KHG Arts!

Hari-Kuyo—A Memorial to Broken Needles

posted in: Uncategorized | 0

HariKuyo.KHGARTS

My broken needles from this past year—apparently more than I would have thought!


Has the pen or pencil dipped so deep in the blood of the human race as the needle?
Oliver Schreiner

A few years ago I began reading about the Japanese Buddhist/Shinto festival day called Hari-Kuyo, also known as the “needle mass,” or “pin festival.” In some parts of the country it is held on December 8th, while in others, on February 8th. The day is traditionally celebrated by kimono makers who gather at the temple to lay needles and pins to rest in beds of soft tofu as a way of giving thanks for their service. They make prayers for improved skills as seamstresses/tailors as part of this 400 year old ritual that seems as funereal as it is celebratory.

I’ve been trying to find out more about it and would love to be able to witness it in person one day. It seems as though it may be diminishing in popular practice just as the needle arts become less common. The ideas that are so central to this festival day struck me as ones I already held dear—that there is joy to be found in small things, practices of economy v. wastefulness, and cultivating respect for the everyday tools that allow us to do so much. In Japan, this is known as Mottainai—the concept of expressing regret towards wasteful behavoir and, in turn, valuing small everyday objects by using them and disposing of them in an economical and respectful way.

I try to pass on related practices when teaching embroidery or hand sewing to my students. I encourage them to think critically about their choice and use of materials as well as the nature of the time they devote to creative endeavors—refocusing on the joy to be found in the process and quality of construction rather than how quickly they can achieve the final product. In our throwaway culture, it is bizarre that such activity seems almost radical.

I cannot claim to be a practitioner of Buddhism or an expert of Japanese culture. This year, however, instead of casually tossing the needles that have become broken, bent, or dull, I I made a conscious decision to set them aside and take note of the beauty and power that is to be found in the things that break in anticipation of projects, work, and dreams fulfilled. These humble little tools pass through all my projects, silent witnesses to the moments taking shape around my work and mindset, to the calm that I find while stitching by hand. It is amazing what utility and beauty such small bits of metal can allow us to achieve and to think of all the hands that take them up to express what words and ink often cannot.


Additional reading
Reuters: Japanese tailors’ needles find soft grave in tofu
The Japan Foundation of Sydney: Hari-Kuyo
Debbie Bates: Hari-Kuyo: Festival of Broken Needles

Reflecting on NEMA 2015: The Language of Museums

posted in: Events, Museums | 0
IMG_8418From Left to Right: Jennifer Emmerson in period dress, Kate Herron Gendreau, and Camille Myers Breeze present at the 2015 New England Museum Association Conference.


After a long-awaited mini-break, I’m back in action and enjoyed having some time to digest the happenings of the 2015 New England Museum Association Conference that took place earlier this month in Portland, Maine.

It was my first time presenting at the conference, so the three fast-paced days kept me on my toes. It was such a pleasure to finally share Andover Figures with our museum colleagues and present a session alongside my partner Camille Myers Breeze titled, “Articulating Bodies: Developing and Disseminating New Tools for Historic Costume Display in Small Museums.” We were delighted to be presenting to a standing-room-only crowd and to lead the great discussion that followed. As much as we have wanted to provide a solution for costume mounting in small museums, we have also wanted to get the word out about the challenges that lead us here and the concepts that have been helpful in the development of the Andover Figures system. If you are looking for any of the handouts from our presentation, you can find them all right here in the Resources section of my website.

NEMAbooth2015Camille and Kate celebrate with a toast during the exhibit hall reception Wednesday evening.


A special thank you goes out to Jennifer Emmerson of the Denison Homestead in Mystic, Connecticut, who was an enthusiastic collaborator in helping us to illustrate the concept and importance of understanding historical silhouette in the interpretation of historic garments. Thanks also go out to John Dunphy, Vice President of University Products, who so graciously provided exhibit space for our product samples. Andover Figures will be available for order via University Products nationwide.

While I didn’t get to attend as many sessions as usual, it was good to connect with colleagues new and old while participating in conversations that I am going to strive to act and think upon in my own practice. There were so many topics to absorb, so I’ll stick to highlighting some content I found especially meaningful and plan to revisit many of these topics individually going forward as I dig deeper:

Session: Emotional Objects
Presenters: Rainey Tisdale and Linda Norris
It was great to see this session back on the schedule this year as I’d missed it in 2014 and was really looking forward to it. It was packed with some great exercises that compelled us to consider how we might construct object-based emotional experiences within the museum space as well as how integral emotion is to committing experiences to memory. I’ve often thought about how an object might be used to provoke an individual emotion, but this session prompted me to consider how we might use object-inspired emotions to communicate between disparate groups in order to form a bridge between them. I also loved the concept of doing a collection inventory to identify which emotions objects elicit and which objects may be underperforming in this area.

Session: How to Have a Difficult Conversation at Work
Presenters: Marieke Van Damme and Sarah Franke
We’ve all had them and I’m always trying to figure out how I can navigate difficult conversations in a way that better facilitates healthy outcomes. So often, we don’t talk about this kind of stuff and tuck away our “authentic selves” while at work. I love that this kind of session acknowledges this as something that can be improved upon because it really can affect organizational performance and outcomes, even if not everyone wants to admit it. It was great to see that people of all experience levels filled the room as we worked our way through different scenarios, considering how relying on facts, mindfulness, humanity, and being genuine can shape a conversation.

Session: Museums Respond to Ferguson: Bringing Race Into the Foreground
Presenters: Aleia Brown and Linda Norris
The room for this session was charged with some of the most raw and impactful dialogue I have witnessed at a professional conference. As difficult as it was at times to navigate, that’s what also made it the most useful and thought-provoking. It’s very hard to boil this down to a bullet point and, really, the point of the talk was that this is a difficult conversation that is incredibly worthy of NOT being boiled down. It is incredibly worthy of more purposeful and considered attention on our part as museum professionals in order to build a framework for productive visitor engagement around the prominent discussion of race in America. To my knowledge, we as NEMA attendees have not gathered to focus on this subject so directly before, so it felt like there were a lot of emotions and thoughts to unpack alongside the intended content. Of course, it was important to acknowledge that the room itself was representative of the majority white/female make-up of museum workers in New England and that if we as a field are to put history to use in shaping a national dialogue on race and inequality, then we must first confront racism and inequality in our own internal practices. I’ve long thought of the museum as that safe “third-space,” the living room of the community so-to-speak. This session challenged the idea that a safe space is not always a productive space for learning and that, if the country is to move forward, we must find better ways to talk about difficult things. Museums have the opportunity to be an agent of great change and we can start by talking to each other about this more and educating ourselves.

There were several other sessions I’ve been hearing great things about on gender, multiculturalism, and language, but was unable to attend in-person. I’d love to hear more from other attendees about what content you are most excited about or challenged by. What are you taking home from NEMA 2015 that you are still digesting, hoping to learn more about, or trying to incorporate into your practice? To follow more reflections and content, you can also check out the hashtag #NEMA2015.

Articulating Bodies in the Museum

websitebanner_red_small

Museum professionals from across the New England region will soon be converging on Portland, Maine for the annual New England Museum Association conference.

KHG Arts and Museum Textile Services will be co-presenting a concurrent session on Thursday, November 5th titled, “Articulating Bodies: Developing and Disseminating New Tools for Historic Costume Display in Small Museums.”

In this session, we will explore the challenges and opportunities of mounting historic costume in the small museum environment, offer practical resources on preventative care of costume for collection managers, and provide an overview of the development and functionality of the Andover Figures costume-mounting system. Borne from Kate’s graduate capstone thesis and research on supporting small museum professionals in working with fragile costume collections, Andover Figures offers a new solution for the display of historic costume that is both safe and cost-effective.

You’ll also be able to find out more about Andover Figures at the University Products booth in the exhibit hall so be sure to stop by. We look forward to connecting with colleagues and striking up great conversations about empowering museum professionals working with costume.


Stitch Library: The Quaker Stitch (Video)

posted in: Embroidery, Stitch Library | 4


It’s time to pull back the big red velvet curtain and reveal my first foray into film…well, video tutorials that is!

Many students have asked me about online stitch tutorials, but I I was always a bit wary of how to go about filming (and making tutorials of any kind can be a big undertaking), but I knew that this format would be the next best thing to being able to sit down together one-on-one. After all, KHG Arts is dedicated to keeping this kind of knowledge alive, so it only makes sense to share resources like these in an open and convenient manner.

There was no question in my mind about which stitch I would choose to feature first though—it had to be the Quaker stitch. Why? Well, it’s one I love working, find very useful, and yet, can find next to nothing about on the internet. I’ve also included it in my Hand Lettered Alphabet Sampler so now anyone who is stitching up this pattern can see it in action. Want to find out even more nifty things about this stitch? Watch the video!

As I mentioned, this is my first time shooting and editing video (you know, if you don’t count all those times I tried to capture our cats on film…), so go easy on me and know that I will continue to hone my skills. I welcome your feedback and hope you will leave any questions or comments below.


To find out more about the history of the quaker stitch, I encourage you to explore these links:

Quaker Tapestry Website

The Quaker Tapestry on Wikipedia

In pictures: Quaker tapestry on show at Blackburn Cathedral

Quakers in Stitches: The Quaker Tapestry—A Community Embroidery for Storytelling and Celebration

The Hand Lettered Alphabet Sampler

posted in: Embroidery, Pattern Resources | 4

Sampler3


Samplers have a long and rich history, exhibiting different styles and functions according to the culture, place, and time they were made in. In Mamluk Egypt, artisans used samplers to show potential customers various stitches and patterns they could choose from to decorate custom pieces. In Medieval England, spot samplers developed as a tool for needleworkers to collect and reference the stitches they learned over time. In colonial America, samplers became a popular pastime for schoolgirls as a way to demonstrate proficiency with the needle, but also as an educational tool for learning the literacy and mathematics.


When it came to designing the Hand Lettered Alphabet Sampler, I wanted to honor that rich tradition but also create something that was fitting for the time we live in. It’s wonderful to see so many fiber arts flourishing once again thanks to the handmade movements of the 1970’s and today. While a handful of needlework organizations keep a wealth of information alive, I’ve found that the contemporary patterns that appeal to many modern stitchers tend to only feature the most basic techniques. This is great for beginners, but thanks to the continued appreciation of handmade in recent years, I think it’s the right time to highlight the next stepping stones in that development.


P1120910 copy


This sampler incorporates 29 different stitches and stitch combinations so that you can start with the fundamental stitches and expand your stitch vocabulary all in one project! It also embraces a love of sophisticated hand lettering to give it an updated vintage aesthetic—making it appealing to stitch and display for the contemporary stitcher and a great learning tool. A complete list of the stitches you’ll find in this sampler is provided below. This is also the general order in which I recommend completing them if you are looking to build your skills as you progress:

Outline Stitches
Straight Stitch
Running stitch
Back Stitch
Stem Stitch
Split Stitch
Quaker Stitch

Chain Stitches
Basic Chain Stitch
Isolated Chain Stitch
Lazy Daisy

Fill Stitches/Laid Work
Turkey Work (Ghiordes Knot)
Lattice/Trellis Work
Satin Stitch
Padded Satin
Slanting Satin
Surface Satin
Brick Stitch
Long and Short Shading
Couching

Cross and Feather Stitches
Basic Cross Stitch
Closed Herringbone
Closed Fishbone

Detached Stitches
French Knot
Seed Stitch
Isolated Chain Stitch

Stitch Combinations, Variations, and Effects
Padded Stem Stitch
Woven Plaid
Alternating Satin
Feathered Chain Stitch Variation
Raised Stem Band Stitch


Remember that you can also personalize a pattern with your own decisions about stitch length and thickness, colors, as well as thread type. You can even swap out stitches for different ones to experiment and test your skills.

Along with the pattern itself, I recommend the following materials to get started on your own sampler:

  • Embroidery needles (I like size 5)
  • Canvas twill fabric (this will provide better support for your heavier fill stitches than plain linen or cotton and is comparable to the type of fabric used in early crewelwork too)
  • Carbon transfer paper and stylus or heat transfer pen
  • 3–5″ hoop
  • Small embroidery snips
  • Cotton floss


The pattern is currently available in my etsy shop. It’s a 7 page PDF that includes a large example photo, a color and stitch guide (not stitch instructions), a basic black version of the pattern in forward and reverse (depending on how you prefer to transfer it), and instructions for my two favorite transfer methods. The completed sampler will fit a standard 11 x 17 inch frame.

If you have any questions about getting started, please feel free to leave a comment on this post and I’ll reply there and update this post with any FAQs. All of the stitches can easily be found in almost any book on embroidery and I’m currently at work on developing some stitch tutorials in addition to the embroidery classes I teach here in Boston (you can check out my calendar for current offerings or contact me to schedule one for you or your organization today. I love customizing them to compliment your setting, museum collection, or audience!

Active Spaces, Active Museums

posted in: Education, Museums | 0

It’s been interesting to see the kind of content museums are sharing during this year’s #museumweek and how they’re using this as an opportunity to celebrate their roles and connect with audiences anew.

Each day has had a themed hashtag, encouraging cultural professionals and institutions to share images, moments, activities, and collections that relate to that day’s theme. Today’s theme happens to be #familyMW, which has many organizations focusing on creative ways to have a successful and fun family museum visit whether that means playing games in the galleries, knowing where and when to take a break, or finding non-traditional ways to connect with the collections and the museum as a safe community space.

As someone who is passionate about hands-on creativity as a means of connection and education within museums, it is exciting to see so many examples of museums “loosening their ties” so to speak and sharing photos of different ways kids (and big kids alike) can creatively experience museums.

Screen Shot 2015-03-27 at 1.42.34 PM


Such a sight as presented in this photo (tweeted from the Smithsonian today) is becoming more common in larger urban art, science, and children’s museums. What I’m not seeing as much of though, but hope to, are smaller history-based museums opening up their spaces in a similar manner. While they may not have rotundas or atriums, I am a firm believer that even the most humble corner filled with inviting kid-size furniture, as well as books, games, and simple crafts that relate to the scope of a museum’s collections, can provide children and families with alternative, but important, pathways towards engaging with objects and stories in a meaningful way.

From my own experience working in a small museum, I know that many families with young children can be turned-off or even intimidated by the formal, crowded-antique shop feel of a historic society’s exhibit spaces. I completely appreciate this in many ways for myself, but realize it often easily dominates the interior space to the detriment of other learning styles. There is so much hyper-localized content awaiting families within their local history museums that could be just as meaningful as the trips they take to the science museum together. Who better to benefit from the personal stories of history than the young?

It’s not enough to let families know that they are welcome or to be open during hours in which they could come—though that is a good start. What’s crucial is that the space itself (or even just parts of the space) inform them, upon arrival, that they too are reflected there and can find accommodation for their learning styles and visitation needs. In pursuing ways to activate a space for a specific audience, we lay the groundwork for magnetic learning opportunities that are not only educational, but fun, memorable, and meaningful. Providing that, to me, is what it means for a museum to truly serve its community.

What space or activities does your small museum have to offer families with children? Is there a corner or shelf that could be put to better use on behalf of an under-served segment of your audience? How about a patch of grass outside safe for active play or even just a feedback wall in the hallway that includes children’s drawings of their museum experiences? I’m going to keep exploring this topic and will share further thoughts as they percolate. I invite you to share yours in the comments below—I love being able to read and respond to them as a explore a topic of interest!


Welcome to KHG Arts

posted in: Announcements | 0

Hello and welcome to the KHG Arts blog!

As the founder and principal here at KHG Arts, I am thrilled to finally be able to combine my interests in textiles and museums under one umbrella. For several years, I have worked with art, material culture, textile, and historic museum and gallery collections in New England and the Mid-Atlantic region as a collections manager and exhibit specialist. I also nurtured a a micro-business of my own designing and selling embroidery patterns featuring contemporary design and traditional craftsmanship. Upon recently graduating with my MLA in museum studies, I knew the time was right to consolidate these interests as an independent specialist. As a result, I am able to bring my passions and expertise together in a way that allows me to concentrate on the kind of projects and partnerships I find so valuable.

I believe that understanding and nurturing the art forms and craftsmanship related to the objects we see in museums is invaluable. Doing so allows museum professionals to better preserve and exhibit the pieces under their care. It also allows them to reach audiences in new ways and provide communities with powerful, hands-on tools for engagement—both within the museum and as empowering life skills that go beyond museum walls.

I’ll be using this space to share more thoughts about the power and use of objects, the value of craftsmanship, and creative methods for making, sharing, understanding, and preserving the textiles that play such such vital roles in the world. I hope you’ll chime in by leaving a comment and invite you to contact me if you are interested in my services as a lecturer, instructor, textile artist, historian, or collections care specialist.